Frequently Asked Questions (FAQ)
Here you can find answers to our most common questions. If you cannot find what you are looking for, please contact our team.
General
How can I get a quote?
You can use our online configurator to calculate it yourself, or request a custom quote by filling out our quote request form.
Can you send a representative to my house?
Once you have received our online quote, you can request the intervention of our technician for exact measurements.
What are the delivery times?
Our delivery times vary from 70 to 90 days from the order. For special custom elements, you should consider two extra weeks.
I want to replace my windows, will there be masonry work?
No! Our installation systems usually do not require any masonry work, avoiding mess and dust.
What is the difference between the "Configurator" and the "Quote Request"?
The configurator is for those who want total freedom in customizing their windows and seeing prices instantly. The quote request is better if you have a budget and want our team to suggest the ideal solution.
Configurator
How do I add the first window?
Enter the width, height, quantity, sash type, and glass type in the dedicated boxes. Then click on "Add row" to start your configuration in our Configurator.
How do I change color and glass?
Click on the image in the "Colors" box to open a menu with available shades. In the "Glass type" box, you can select special glasses.
How do I change the opening type?
Click on the text above the image in the "Item type" box to access a wide selection of sash types.
How do I change the product tier?
Using the slider on the top left, you can choose between BASIC, MEDIUM, and TOP class. To the right of the slider, you will find the brands available for that tier.
How do I request the final quote?
Just click on "Request Quote" at the top right, confirm your choices, and provide your name and email address where the quote will be sent.
Quotes & Orders
How do I choose the perfect product?
By using our custom quote request form, our experts will help you find the best uPVC windows for your specific situation.
How does the online request work?
Simply choose the product tier and your preferred brand. Enter approximate measurements and you can add accessories and installation services.
Why are your prices so competitive? Are you compromising on quality?
Absolutely not! Our low prices are the result of efficient logistics and direct online sales. Every order is processed on a highly structured, automated, and digitally optimized platform, fully exploiting every possible cost-saving opportunity. We source high-quality raw materials directly from renowned (e.g., German) manufacturers like Schüco or Rehau. Be wary of *too* low prices on the market: they often hide inadequate logistics (e.g., unloading 180kg windows right on the sidewalk!).
How can I request the technical measurement service?
After receiving your quote, you can request an at-home measurement via our online form.
Ecobonus (Tax Deduction)
Who is eligible for the Ecobonus?
The 50% tax deduction can be claimed by homeowners, tenants, condominiums, and professionals, provided they meet the specific requirements. Read more on our Ecobonus page.
What works are deductible with the Ecobonus?
Deductible works include: insulation or replacement of roller shutter boxes, supply and installation of windows, front doors, skylights, roller shutters, and blinds. The new elements must comply with legal U-value limits.
How to apply for the Ecobonus?
The request must be submitted within 90 days from the end of the works on the ENEA portal. Payments must be made via a special bank transfer ("bonifico parlante").
Measuring & Installation
How do I measure for new windows correctly?
Measure the width and height of the opening at three different points and take the smallest measurement. Deduct about 10-15 mm of clearance (fitting tolerance) from both the width and height. This gap is necessary for proper sealing and insulation with expanding foam and tapes.
If you are unsure, you can always request our professional measurement service!
If you are unsure, you can always request our professional measurement service!
Does replacing old windows require masonry work or cause a mess?
In most cases, no! Old wooden frames can be cut out cleanly. Alternatively, we use a special "Z" frame (renovation frame with flange) that covers the old frame completely without any dust, mess, or the need for a bricklayer.
Can I install the windows myself or do I need a professional?
If you are an experienced DIYer, installation is absolutely feasible using our step-by-step guides. However, to guarantee maximum thermal and acoustic insulation and perfect sealing, we highly recommend professional installation. WinDirect offers an installation service to handle everything for you.
What is certified installation (3-Level Principle)?
A high-performance window is useless if installed poorly. Our qualified installation respects strict energy-saving standards and seals the window on 3 distinct levels:

- Internal Level (Vapor Barrier): Prevents moist room air from entering the joint, avoiding mold.
- Middle Level (Thermal & Acoustic Insulation): Uses elastic PU foam or expanding tapes (e.g., Multitermo TP652) to block noise and heat loss.
- External Level (Weather Barrier): Waterproof against driving rain and wind, but vapor-permeable so moisture can escape outside.

Installation guide: How is the window properly fixed to the wall?
For a solid and lasting installation, follow these golden rules:

- Drilling: If the frame is not pre-drilled, drill 6 mm holes in the center of the profile.
- Screw Spacing: Screws should be 50 to max 75 cm apart, and 10-15 cm away from the inner corners.
- Frame Screws: Use universal self-tapping frame screws for wood, masonry, and concrete (without dowels).
- Insulation: Once fixed, insulate the perimeter gap with PU foam or expanding tape for perfect thermal sealing.

How do I hang and unhang the window sash?
Hanging and removing the window sash (e.g., with TITAN hardware) is straightforward if you follow the correct steps.
Hanging the sash:
To remove the sash, proceed in reverse order. Pull the top pin downwards (be careful not to pull it completely out or drop it) and lift the sash off the bottom hinge.
Hanging the sash:
- Step 1: Place the sash onto the bottom frame hinge pin.
- Step 2: Align the top of the sash. For TITAN hinges, the top stay pin should be inserted with the sash open at an angle between 0° and 60°.
- Step 3: Push the top pin upwards to lock the sash in place. Warning: Never use a hammer!
To remove the sash, proceed in reverse order. Pull the top pin downwards (be careful not to pull it completely out or drop it) and lift the sash off the bottom hinge.

How are the trims and window handle installed?
The final touches are crucial for the window's aesthetics:
- Trims and Cover Profiles: The insulation gap is covered with a universal PVC trim profile. These profiles are often pre-scored on the back to be snapped to 10, 20, or 30 mm widths and glued with special PVC glue or silicone.
- Handle Installation: The handle is simply secured with two screws to the internal gear mechanism.
- WARNING - Protective Film: Remove the protective film from the PVC profiles after painting, and strictly no later than 3 months after installation. Otherwise, the sun could bake the film onto the frame, making it nearly impossible to remove!

Glass, Insulation & Technology
How does Low-E glass work for thermal insulation?
Modern uPVC profiles act as true thermal shields. Solar energy enters as short-wave radiation, but internal heating heat is long-wave. Low-E glass features a microscopic silver layer that acts as a thermal mirror: it reflects internal heat back into the room, preventing loss, while allowing solar energy in for valuable Passive Solar Gain in winter.
What are the components of highly energy-efficient glazing?
To achieve maximum thermal insulation, we combine several technologies:
- Double or Triple Glazing: Triple glazing doubles the insulation effect, ideal for passive houses.
- Warm Edge Spacers: Old aluminum spacers are replaced with insulating materials to eliminate thermal bridges.
- Inert Gases: The cavity is filled with Argon or Krypton, which conduct heat much less than air.
- Ug-Value: A standard double glass offers a Ug of 1.0-1.1 W/m²K, while triple glazing drops the value to 0.4 - 0.7 W/m²K.
How does solar control glass work?
It offers the ideal combination of brightness and protection against overheating.
- Heat Shield: Blocks excess solar heat, reducing the need for air conditioning.
- High Light Transmission: Keeps a neutral appearance and lets in up to 70% of natural light.
- Selectivity: A high value means lots of light enters, but very little heat.
What is the best glass for acoustic insulation?
A standard WinDirect double glazing unit already offers an excellent base acoustic reduction of 32dB. For homes exposed to heavy traffic, sound-absorbing glasses are used based on:
- Mass: Thicker glass panes create a bigger barrier.
- Asymmetrical Structure: Combining panes of different thicknesses blocks a wider range of sound frequencies.
- Acoustic PVB: Special dampening films achieve sound reductions of up to 54 dB.
Acoustic abatement guide: how many dB do I need?
Choose your acoustic insulation based on your location. Here is our guideline table:
| Product Tier | Traffic Intensity | Distance to Road | Recommended Abatement |
|---|---|---|---|
| Basic / Medium | Local road (10-50 cars/h) | over 35 m | > 27 dB |
| Basic / Medium | Local road (10-50 cars/h) | 26 - 35 m | > 32 dB |
| Basic / Medium | Local road (50-200 cars/h) | 26 - 35 m | > 37 dB |
| Topclass | Main road (1000-3000 cars/h) | 100 - 300 m | > 42 dB |
| Topclass | Main road (1000-3000 cars/h) | less than 100 m | > 47 dB |
What is safety and anti-burglary glass?
Built by laminating panes together with elastic PVB films.
- Safety Glass: Mandatory for French doors. If broken, the film holds the fragments together, preventing sharp shards.
- Anti-Burglary Glass: Uses thicker films (Class P2A and above) to significantly increase the time and effort needed for an intruder to break in.
Windows with Georgian bars (muntins): Are they hard to clean?
WinDirect recommends using internal Georgian bars positioned inside the double glazing unit. Because the bars are sealed between the glass panes, the outer glass surfaces remain completely smooth. Available in various thicknesses and colors, this system makes window cleaning effortless compared to traditional external bars.


Are there special or high-tech glasses?
Yes! Technology offers unique solutions:
- Radio-transparent Glass: Highly insulating windows can block cell signals. Special micro-structures allow signals (including 5G) to enter while keeping thermal insulation intact.
- Patterned/Obscure Glass: Ideal for bathrooms, ensuring privacy without blocking light.
- Vacuum Glass: Offers triple-glazing insulation in just 6mm of total thickness by creating an absolute vacuum.
- Self-cleaning Glass: Uses UV rays and rain to break down and wash away dirt from the outside surface.
Is it difficult to replace the glass in a uPVC window if it breaks?
Not at all, and this is one of the biggest advantages of uPVC! Unlike old windows, ours use a "dry glazing" system and snap-on glazing beads. The beads can be easily unclipped, allowing the glass pane to be replaced cleanly in minutes without breaking anything.
We follow strict technical guidelines for glass installation:
We follow strict technical guidelines for glass installation:
- Dry Glazing & Seals: We avoid messy silicone sealants that can trap moisture. Instead, high-quality EPDM gaskets ensure a perfect seal, proper vapor pressure equalization, and optimal drainage.
- Professional Glass Packing (Setting Blocks): The weight of the glass is transferred to the frame using specific polymer setting blocks (never wood in uPVC!). This keeps the window sash perfectly square and prevents sagging over time.
- Material Compatibility: All seals and blocks are 100% chemically compatible with the insulating glass edge seal to maximize its lifespan.
Ventilation Systems & Aerators
What are window aerators and why are they important?
Aerators allow for continuous room ventilation even when windows are closed, solving the problem of condensation and mold. A university study of 5,000 cases showed that over 22% of homes have aesthetic or structural damage (peeling paint, ruined furniture) due to humidity. Preventing mold protects your health (avoiding allergies and respiratory issues), improves air quality, and can even reduce heating costs.
What are the general benefits of these integrated systems?
The main advantage is self-regulation: the system ventilates the rooms autonomously. They are silent, maintenance-free, and completely invisible. Because they are integrated into the window frame, they do not alter the internal or external aesthetics of the house in any way.
How does the Regel-air® ventilation system work?
The Regel-air® system uses wind pressure as a natural driving force to generate "cross-ventilation": fresh air enters from the windward side of the building, while stale air is drawn out from the opposite side. The modules contain special flaps that close automatically during high winds to block drafts, and reopen when the pressure drops.
How does the Rehau AirComfort system work?
Designed specifically for uPVC windows, Rehau AirComfort is made of high-quality coated EPDM and tested by the IFT certification institute (up to insulation class 4). It operates flexibly, silently, and invisibly, regulating the air intake and blocking excess air during strong winds. It is the ideal solution for combating humidity in critical rooms like bathrooms and kitchens, or in north-facing houses.
Hardware & Security
What are the strengths of Siegenia, Maico, and Roto hardware?
We work with the 3 market-leading manufacturers:
- Siegenia (TITAN): Focuses on intelligent self-adjustment and smooth operation.
- Maico: Stands out for extreme load capacity (up to 220 kg with "Mammut" hinges) and superior "Silver Look" rust protection.
- Roto (Roto NX): Specialized in precise mechanics for heavy glazing and certified RC2 security as standard.
What is micro-ventilation and how does it work?
Micro-ventilation allows for healthy air exchange while minimizing heat loss and maintaining security:

- Siegenia: An energy-saving arm limits the tilt opening to about 40 mm.
- Maico: By turning the handle 45°, the mechanism safely locks the sash at a fixed distance of 10 mm from the frame.
- Roto: Tilting the handle to 135° provides draft-free ventilation without needing additional frame elements.

How do I adjust the window hardware if the sash is dragging or rubbing?
If your uPVC window sash touches the frame or doesn't close properly, you can easily adjust it using the Allen screws on the hinges (refer to the color-coded diagram):

- Sash drags at the bottom (Green): To raise the sash, tighten the bottom Allen screw.
- Sash drags at the top (Green): To lower the sash, loosen the same bottom Allen screw.
- Sash is out of plumb or drags at the front (Red/Blue): Adjust the screw on the top stay hinge to straighten the sash.
- Insufficient gasket pressure (Gray): To increase weather-stripping pressure, rotate the mushroom cams around the sash perimeter.

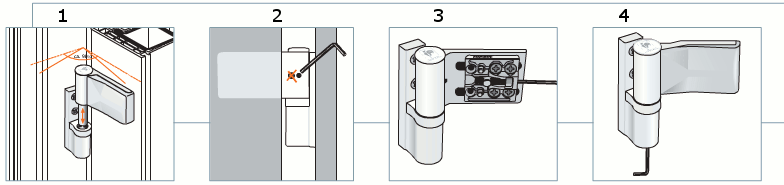
How do I adjust the front door hinges?
To adjust your front door hinges (e.g., Dr. Hahn):
1. Lift and remove the door sash while in the open position (approx. 90°).
2. Adjust the pressure on the weather seals via the hinge pin.
3. A horizontal adjustment of +/- 5 mm is possible to center the sash.
4. The door height can be raised by +4 mm or lowered by -3 mm.

1. Lift and remove the door sash while in the open position (approx. 90°).
2. Adjust the pressure on the weather seals via the hinge pin.
3. A horizontal adjustment of +/- 5 mm is possible to center the sash.
4. The door height can be raised by +4 mm or lowered by -3 mm.